Tailscale VPN Setup
A brief technical description of Tailscale: Tailscale builds an encrypted private network using WireGuard, while handling peer discovery, authentication, NAT traversal and changing public IP addresses for you. Unlike a traditional self-hosted WireGuard server, it normally does not require port forwarding or a dynamic DNS service. I still prefer bare WireGuard as my primary VPN when it is available because it is simpler and can provide better throughput, but Tailscale is an excellent backup and is sometimes the only practical option.
Reasons to choose Tailscale include:
- The network you connect to while traveling blocks your normal WireGuard port or otherwise prevents that tunnel from connecting.
- Your home ISP uses CGNAT, as is common with Starlink, cellular and some fixed-wireless providers, so inbound port forwarding is unavailable.
- You do not control the primary ISP router and cannot configure port forwarding.
gl-tailscale-fix plugin immediately, regardless of firmware, including 4.9+. Do not treat GL.iNet's native 4.9+ controls or kill switch as a substitute for the plugin. A GL.iNet router used only as the home exit node can follow its firmware-specific native controls where available; older supported home-router firmware may need the plugin. See Route A, Step 4 and Step 6 below.
Whenever possible, Tailscale establishes a direct peer-to-peer connection. In some cases it cannot, so traffic uses one of Tailscale's DERP relay servers instead, which can reduce throughput and add latency. Tailscale documents several steps that may help establish a direct connection. For more information on bare WireGuard versus Tailscale and why I use WireGuard as my primary and Tailscale as my backup, see my VPN Comparison page.
It is also possible to host your own DERP relay server, but it can be complex for someone inexperienced with networking and web hosting. For this reason, I offer a monthly option on my Tiers page (Diamond Tier) to use your own unthrottled custom DERP relay server with a simple ACL configuration.
Relay update: Tailscale has introduced Peer Relays, an easier built-in way to turn a device in your tailnet into a high-throughput relay. Peer Relays entered public beta in October 2025 and became generally available in February 2026. The important caveat is that Peer Relays use a configurable UDP port which must be reachable by the participating devices. If blocked UDP is the reason a direct connection cannot be established, a Peer Relay may be unreachable for the same reason. That is why I still use the older custom DERP approach: its TCP-based relay path is more likely to work through restrictive firewalls that block UDP.
Note: When Tailscale is running on the travel router, corporate VPN software running on a connected laptop does not control whether the router establishes a direct Tailscale connection or uses a DERP relay. However, corporate VPN software can still affect traffic after it reaches the laptop, including possible routing, DNS, or MTU compatibility issues. If you experience MTU-related problems, a ZeroTier-based setup may be a better alternative.
Before I continue with the technical implementation, a quick disclaimer: I am not liable for any troubles you cause yourself or your company including but not limited to: termination of employment due to policy violation, failure to obey tax compliance laws, protection of customer data, country data requirements in your respective country.

Equipment Needed:
- Server:
Raspberry Pi 4B or 5 (with SD card) (or any Linux “thin client” will do, $50–100).
I do not recommend the AppleTV due to an existing issue. - Server (GL.iNet alternative): Instead of a Raspberry Pi, a compatible GL.iNet router can remain at home and act as the Tailscale exit node. Choose Route A below and follow the firmware-specific home-router controls. If the GL.iNet router will be used as the travel router, the RemoteToHome plugin is required there regardless of firmware.
- Brume 2 (GL-MT2500A): Compact, economical, and Wi-Fi-free, making it a practical dedicated or backup home endpoint.
- Beryl AX (GL-MT3000): A compact Wi-Fi 6 router with one LAN port that can serve as either the home endpoint or travel router.
- Brume 3 (GL-MT5000): The newer high-throughput version of GL.iNet's compact, Wi-Fi-free security gateway.
- Flint 2 (GL-MT6000): A full-size Wi-Fi 6 home router suited to replacing a compatible ISP router, improving home coverage, or supporting multiple users.
- Travel router: This accompanies you and routes connected devices through your Tailscale exit node.
- Beryl AX (GL-MT3000): The lower-cost high-performance option, with Wi-Fi 6 and one LAN port for a wired device.
- Slate AX (GL-AXT1800): Slightly larger, with two LAN ports and more convenient compatibility with EAP networks in offices and coworking spaces.
- Beryl 7 (GL-MT3600BE): A newer compact Wi-Fi 7 travel router with one LAN port and substantially higher routing performance.
- Slate 7 (GL-BE3600): A Wi-Fi 7 travel router with one LAN port, a built-in display, and EAP compatibility.
- Misc: Thunderbolt and/or USB-C to Ethernet adapter for laptop (if required), 2–3 ethernet cables of varying sizes. One cable for Pi <-> Home Router LAN, one cable for Laptop <-> Travel router LAN, and an optional 10ft cable for Travel router WAN <-> Local network router (at your Airbnb, hotel, etc.).
- (Optional) Portable battery for powering your travel router on the go when a wall outlet is not accessible. And a fan for your Pi server
Router performance depends on both internet connections, relay use, network restrictions, firmware, and connected devices. Confirm that your exact model and firmware support the Tailscale features used in this guide. As an Amazon Associate, The Wired Nomad may earn from qualifying purchases.
GL.iNet now supports Tailscale on a much wider range of routers; use the current supported-model list rather than relying on an old fixed list. Firmware availability and menu names vary by model. Route A documents native controls for a home GL.iNet exit node that already provides them; do not upgrade a travel router to 4.9+ as a substitute for installing RemoteToHome's plugin. For remote-work travel use, install and enable gl-tailscale-fix on the travel router regardless of firmware.
Choose Your Setup Route
You only need one device acting as the home exit node. Choose the route that matches your hardware and firmware, complete that section, and then continue with the shared travel-router instructions in Step 4.
GL.iNet home exit node
Use the native Run Exit Node control on a compatible home GL.iNet router when available. The travel router still requires the RTH plugin on every supported firmware.
Use the GL.iNet routeGL.iNet before firmware 4.9
Use RemoteToHome's plugin to add Advertise as Exit Node without modifying GL.iNet-owned system files.
Use the plugin routeRaspberry Pi or Linux
Use a dedicated Linux exit node when your router is unsupported or when you prefer to keep the VPN server separate.
Use the Pi routeRoute A: GL.iNet Home Exit Node
This route replaces Raspberry Pi Steps 1–3. Plug the GL.iNet home router's WAN port into a LAN port on your primary home router, connect a personal computer to the GL.iNet router's LAN port, and open its admin panel (normally http://192.168.8.1).
If the home GL.iNet is already on firmware 4.9+
- Open Applications > Tailscale, enable Tailscale and bind the router to your tailnet.
- Enable Advertise WAN Subnets. This creates the forwarding path required for exit-node clients to reach the internet.
- Optionally enable Advertise LAN Subnets if remote tailnet devices should also reach devices on the home network.
- Enable Run Exit Node and click Apply. Wait for the status to return to green.
- In the Tailscale Machines page, select the router, open Edit route settings, approve Use as exit node and approve only the intended subnet routes.
- Disable key expiry for this unattended home exit node.
If the home GL.iNet already runs firmware 4.9+, the RTH plugin is not required merely to advertise that home router. This exception applies only to the home exit node; it does not apply to the travel router. Install and enable the plugin there before remote work, regardless of firmware, because its daemon-independent kill switch extends protection to IPv6, the guest network and exit-node changes.
Firmware Earlier Than 4.9
- Open Applications > Tailscale, enable Tailscale and bind the router to your tailnet.
- Enable Allow Remote Access WAN. Without it, clients may connect to the exit node but cannot reach the internet.
- Optionally enable Allow Remote Access LAN if you want tailnet access to the home network.
- Install RemoteToHome's
gl-tailscale-fixpackage, then enable Advertise as Exit Node under Tailscale Enhanced. - In the Tailscale Machines page, approve Use as exit node and the intended routes, then disable key expiry.
Install the RemoteToHome Plugin
Use either installation method from the maintainer's current guide:
- Admin panel: Download the latest
gl-tailscale-fix_latest_all.ipk, then open System > Advanced Settings > LuCI > System > Software > Upload Package. - SSH: Connect with
ssh [email protected], then run:
wget -q https://github.com/RemoteToHome-io/gl-tailscale-fix/releases/latest/download/install-gl-tailscale-fix.sh -O install-gl-tailscale-fix.sh && sh install-gl-tailscale-fix.shAfter installation, return to Applications > Tailscale. The additional controls appear under Tailscale Enhanced. Do not edit /usr/bin/gl_tailscale; current plugin installers detect and restore that obsolete manual modification to avoid conflicts.
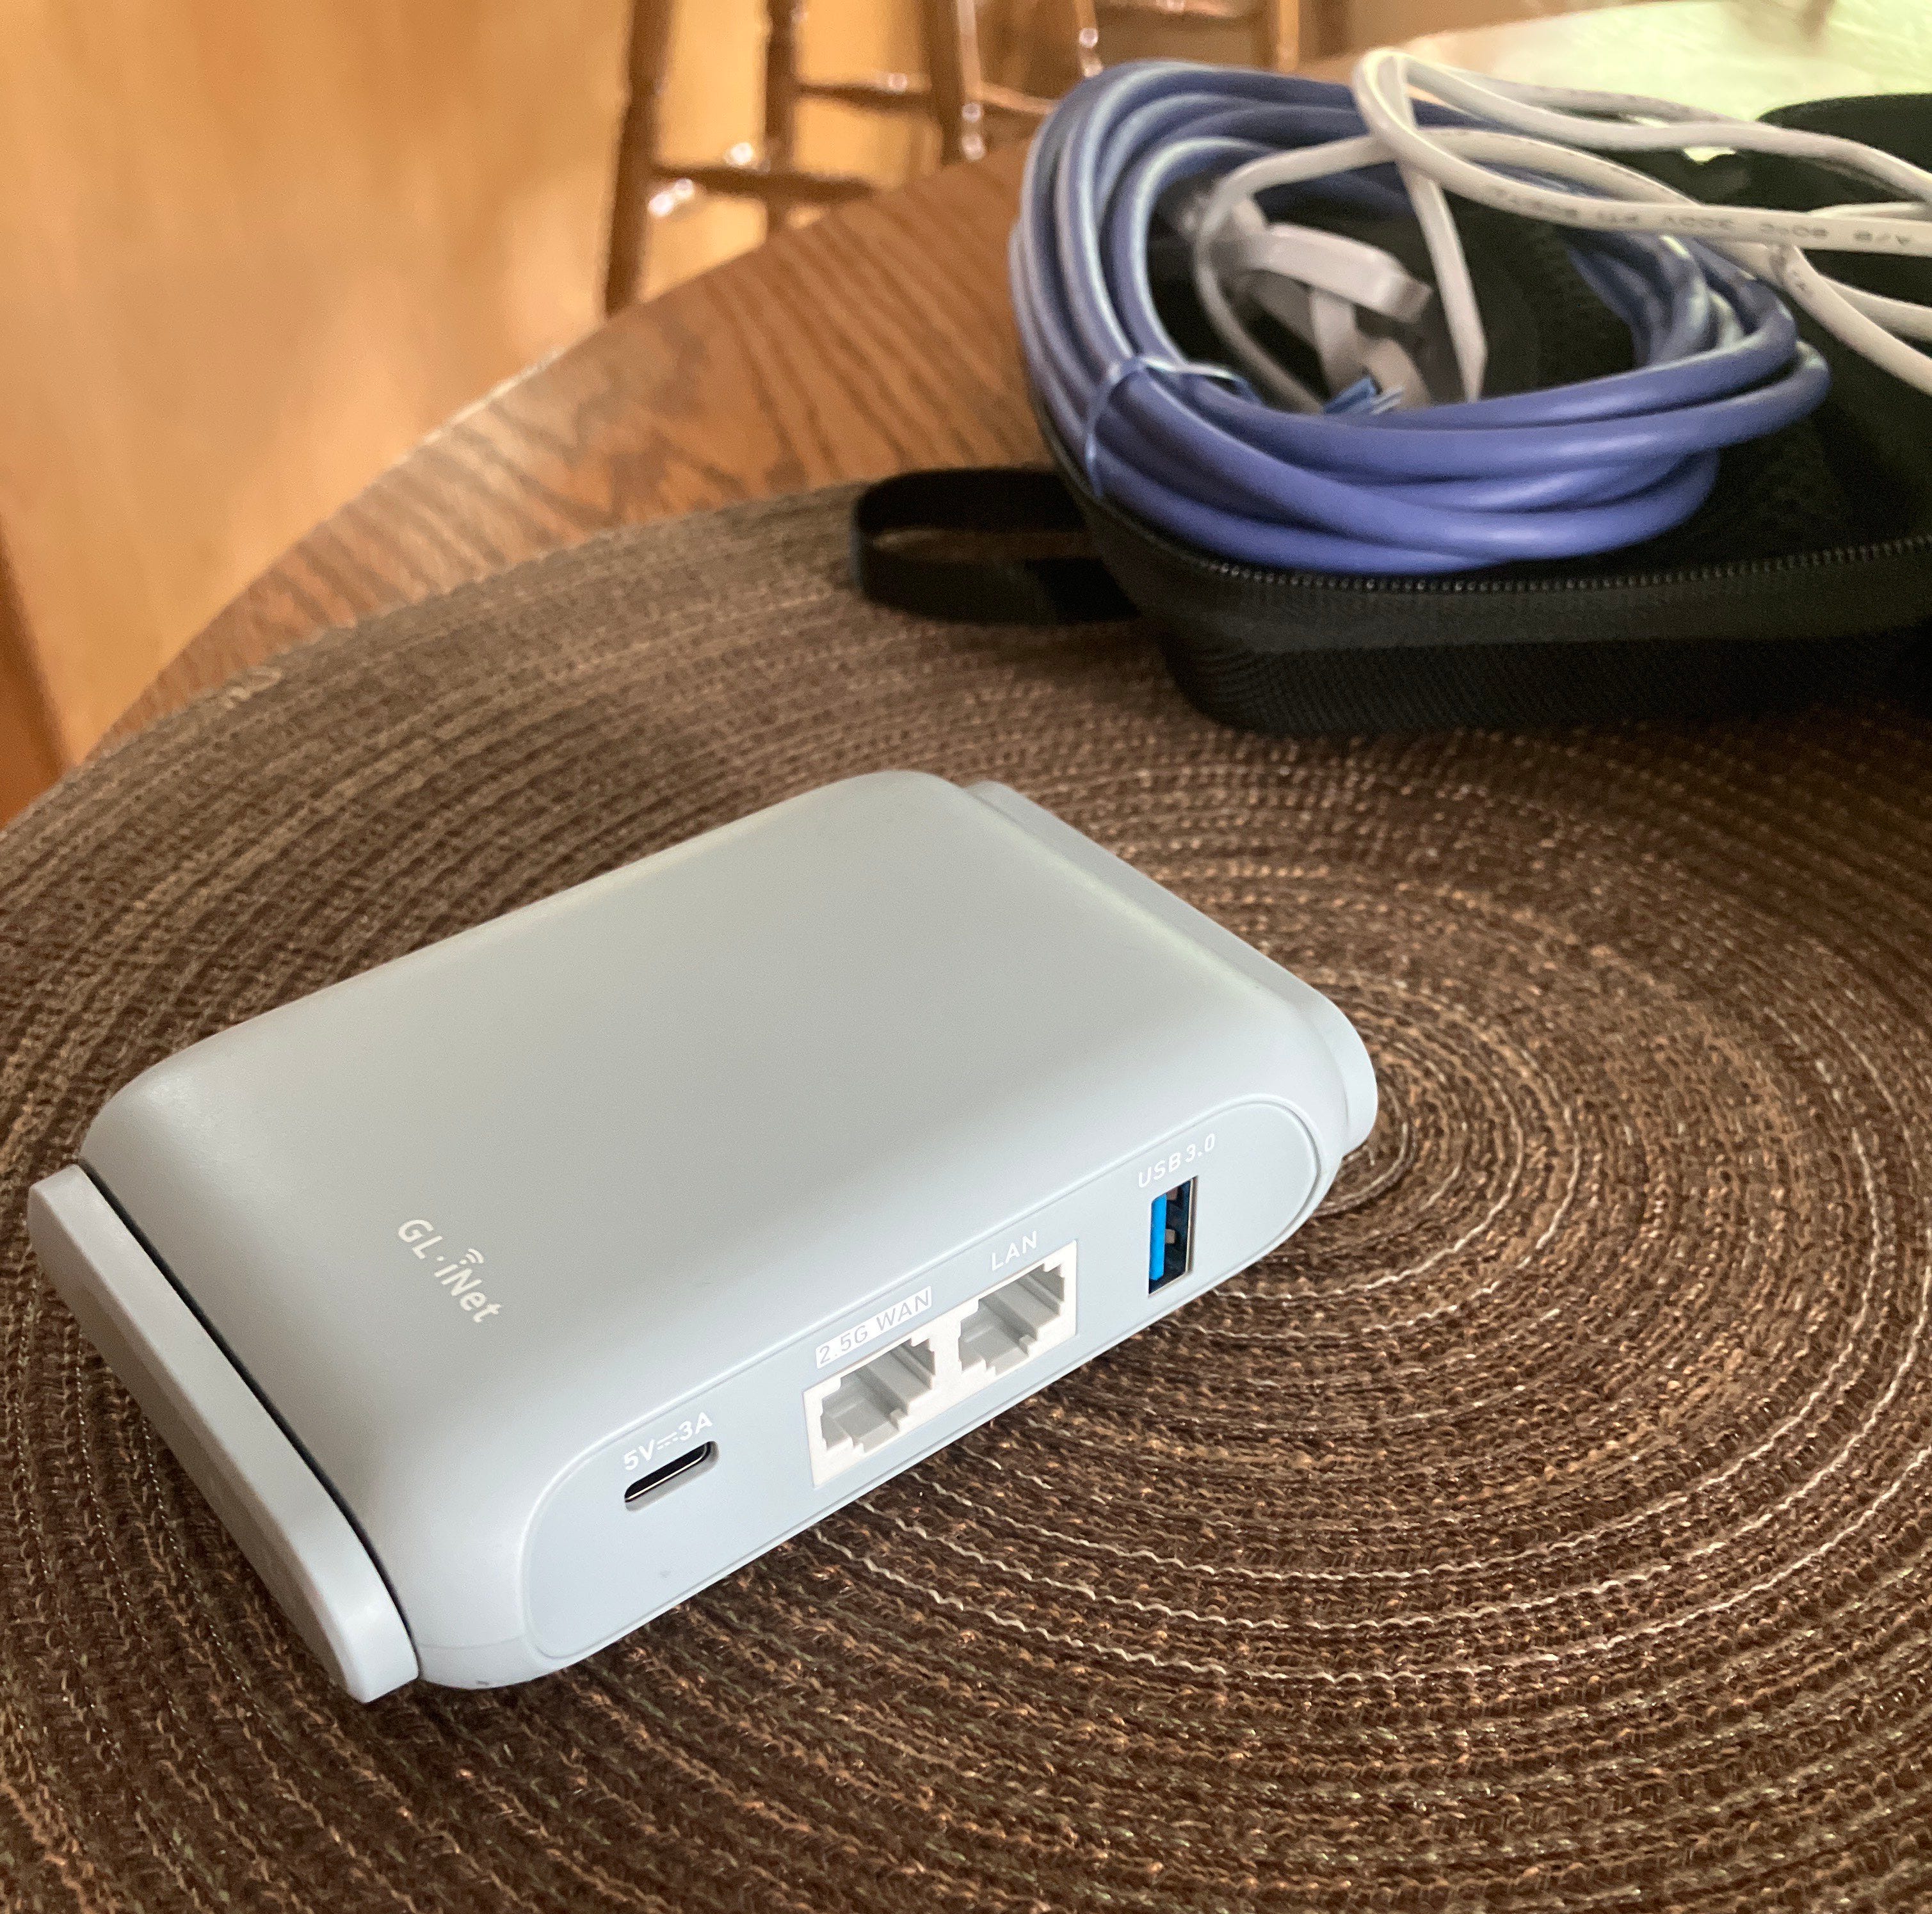
A travel router is needed because we are unable to install 3rd party software, let alone a VPN client, onto our work machine. So we will connect the work computer to the travel router like a normal Wi-Fi network, and the router will point everything to our VPN server. Think of the travel router as a repeater that takes your Airbnb/hotel Wi-Fi network and re-broadcasts it to your device. Of course, we will only use a wired ethernet connection from the laptop to the travel router, never Wi-Fi as this can expose our location.
Route B: Raspberry Pi or Linux Exit Node
Follow Steps 1–3 below only if you selected the Raspberry Pi/Linux route. GL.iNet exit-node users should continue directly to Step 4.
1. Flash your microSD card using the official Raspberry Pi imager on your laptop or desktop.
Raspberry Pi Documentation - Getting started
The official documentation for Raspberry Pi computers and microcontrollers
Insert the microSD card into your personal laptop using whatever adapter necessary. Install the official Raspberry Pi Imager and go follow the steps to flash the OS to your microSD. Don't forget these things:
- Choose Raspberry Pi OS (aka "Raspbian") and select the 64-bit version! (64-bit OS will give you ~44% faster throughput than 32-bit OS)
- Set hostname to "raspberrypi.local" to make logging in easier than remembering the IP which you set later.
- Enable SSH in the Advanced Options!
- Configure your Wi-Fi network for the Pi to connect to, OR use internet sharing (Mac)
Once you finish flashing the microSD, insert it into the Raspberry Pi and power the Pi. Then, attach an Ethernet cable between the Pi and your computer (you may need a Thunderbolt or USB-C to Ethernet adapter). Turn off Wi-Fi on your Mac so we can only connect to the Pi.
Navigate to your command prompt or terminal (on Mac/Linux), or on Windows open start menu and type "command prompt" and connect to the Pi by running 'ssh username@hostname'. Below, we use the default 'pi' username and the 'raspberrypi.local' hostname. Alternatively, you can use the Pi’s IP for the hostname assuming your laptop has a built-in DHCP server (it should).
ssh [email protected]
or if that doesn't work, use the Pi's IP address:
ssh pi@your-Pi-IP-address
You can find the Pi IP address a number of ways. One way is to go into Network settings on Mac and view the IPv4 address on the Ethernet connection. Or type "ifconfig" in the terminal.
Note that as you type in the password, you will not see the characters show on the screen. This is normal. If you having issues with SSH, it's possible you have a bad cable.
Once you’ve logged into the Pi via SSH, run the following:
systemctl enable sshsystemctl start sshThese two commands will permanently enable SSH on the Pi and start the service. This really shouldn’t be necessary since the imager should already run this for you, but it doesn’t hurt.
And lastly (optional), disable Wi-Fi since we don’t need it and to reduce power draw.
1. Open the config.txt file located on the boot partition: /boot/config.txt inside Raspberry Pi.
2. Add dtoverlay=disable-wifi under [all] to disable Wi-Fi.
3. Save and reboot your Raspberry Pi.
To enable it again just remove dtoverlay=disable-wifi in your configuration and reboot.
Simply re-run this command but with “unblock” if you wish to re-enable it ever.
2. Configure a static IP for the Raspberry Pi for an ethernet connection to your local network.
First, we need the subnet to match the local internet’s. So, verify whether your router at home uses 192.168.1.x or 10.0.0.x addresses (remember x is only 1-254). To do this, open a terminal window on your laptop connected to the Wi-Fi and type ifconfig and then look for the IPv4 addresses to the right of en0:. Alternatively, go to your network settings and view the IPv4 address. Also, take note of the router IP, you will need that in a second.

Next, we will modify /etc/network/interfaces and add some code. Note: Since Bookworm, you will have to follow these instructions to configure the static IP.
Use your preferred editor by typing sudo nano /etc/network/interfaces or sudo vi /etc/network/interfaces.
Add the below block of code, where “??”, is any number (0–254) that is not a currently used IP on your network. Next, 10.0.0.1 is the IP of the Xfinity home router in my case. Replace this with whatever your router IP. This is set to both the gateway and dns-nameservers entries as shown below. 8.8.8.8 is an additional DNS entry and happens to be Google’s server.
        #static IP address for eth0
        auto eth0
        iface eth0 inet static
            post-up /sbin/ethtool --set-eee eth0 eee off
        address 10.0.0.??
        netmask 255.255.255.0
        gateway 10.0.0.1
        dns-nameservers 10.0.0.1 8.8.8.8
eth0 at the top specifies that we are using an ethernet connection to our router’s LAN port. Using an ethernet/wired connection to your home’s internet service ensures the fastest possible speeds.
Reboot for the changes to take effect.
sudo rebootNow, plug the Pi into one of your home router’s LAN port and ensure the green light is blinking.
3. SSH into your Raspberry Pi, install Tailscale, and enable exit node
Now that we’ve set a static IP for the Raspberry Pi and connected the Pi to the router, we should be able to access it by using SSH on the local network. Using your laptop (connected to the home Wi-Fi) open a terminal window and type:
ssh [email protected]OR
ssh pi@static-IP-you-set (ex. 10.0.0.?? or 192.168.1.??)If you are successfully able to access your Pi, then congrats for making it this far! If not, there could be a problem with the IP you set. Go verify your /etc/network/interfaces again.
We’re ready to install Tailscale on the server to create the VPN, or what Tailscale calls an “exit node”. To install on your Rasp Pi running Linux, simply run the following command:
curl -fsSL https://tailscale.com/install.sh | shIf this doesn’t work, then determine the particular OS you are running on the Pi. If you don’t remember, simply run the command below and read the first line of the output:
cat /etc/os-releaseYou’ll see the Linux distro name on your Pi. Using this info, try a manual install by following instructions here.
Once installed, follow the Tailscale documentation in order to set up your exit node. Be sure to select the "Linux" instructions in order to properly configure your Raspberry Pi's operating system. Step 2 and 3 here: https://tailscale.com/kb/1103/exit-nodes/
Run the IP-forwarding commands:
echo 'net.ipv4.ip_forward = 1' | sudo tee -a /etc/sysctl.d/99-tailscale.conf
echo 'net.ipv6.conf.all.forwarding = 1' | sudo tee -a /etc/sysctl.d/99-tailscale.conf
sudo sysctl -p /etc/sysctl.d/99-tailscale.conf
NOTE: In Step 2, run it as:
sudo tailscale up --advertise-exit-node --accept-routesThis allows the GL.iNet subnets that we approve in Step 5. If you missed it, you can run the command again later.
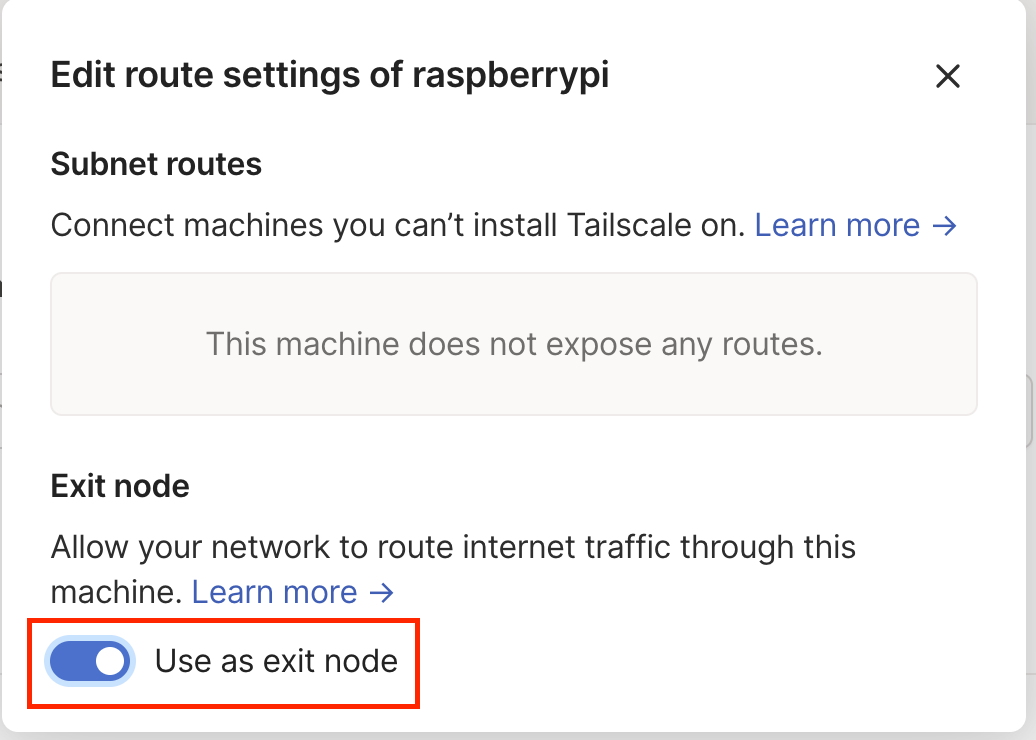
Once finished, give your Tailscale web admin panel a look-over to confirm everything is configured correctly as the documentation instructs. For example, click the 3 dots button all the to the right of the "raspberrypi" exit node and click on "Edit route settings…" and make sure exit node is switched ON.
Your Tailscale machines page should now show your Raspberry Pi and your Travel Router as such:
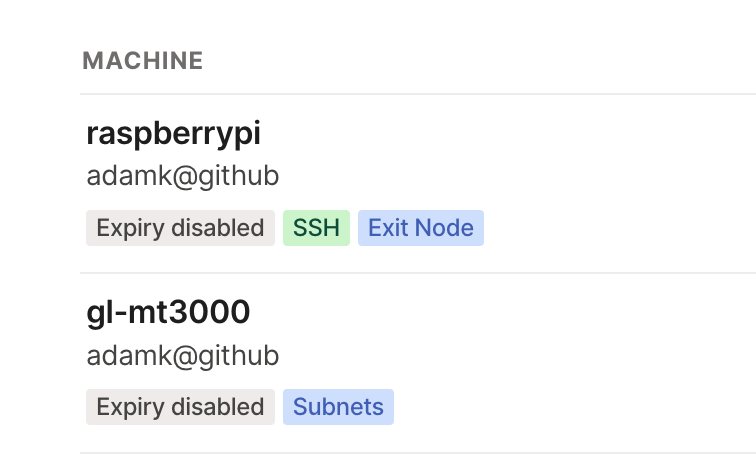
Don't forget to click the 3 dots on the right side for both the Pi and the GL router and "disable key expiry" for both the Pi and your GL-iNet router. This is extremely important to ensure we maintain authenticated. For example, if the key expires on the exit node and you are out of the country, you will be unable to regenerate a key without manually being present at the Raspberry Pi.
In general, Tailscale documentation is very good so it's good to refer to it often throughout the process.
4. Connect to your GL-iNet travel router, enable Tailscale, and configure it to point to your exit node
gl-tailscale-fix plugin, regardless of firmware, including 4.9+. Do not use GL.iNet's native 4.9+ controls as a substitute; the plugin is required for the travel router's firewall and kill-switch protection. See the plugin installation methods above.
Once your exit node is live and all settings are correct based on Tailscale documentation, we can configure the travel router.
Simply connect an ethernet cable between the powered GL-iNet router’s LAN port and your personal laptop. Then, open a browser and type 192.168.8.1 to see the login screen.
Once you’ve logged in, enable the Repeater function on the “Internet” page, and connect the router to your cellphone hotspot or some Wi-Fi network other than the home network hosting your exit node.
Next, navigate to the Applications page and at the bottom enable Tailscale. If you don’t see Tailscale and/or the installation of the Tailscale plugin fails, verify that your exact model is supported and follow the current GL.iNet firmware guidance; do not treat a firmware upgrade as a substitute for the required RemoteToHome plugin.
Follow the binding instructions here: Tailscale - GL.iNet Router Docs 4
Enabling Tailscale will allow us to force all Internet traffic coming into the router (i.e., from your work laptop) to pass through your VPN server (aka “exit node”) back at home.
Once you’re finished with this step, you can confirm the router has Tailscale installed and connected to your account by viewing the Tailscale web admin page to see “Connected” with the green dot as shown below:

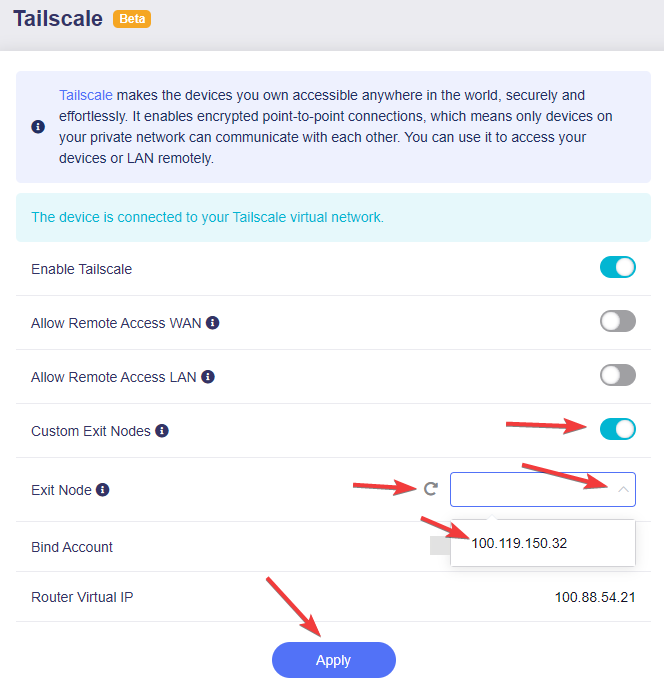
Enable Custom Exit Node, select the home exit node and click Apply. If this travel router is already running 4.9+, use its Advertise LAN Subnets control; older supported firmware may show Allow Remote Access LAN. Enable IP Masquerading if it is exposed by your current GL.iNet guidance. The RemoteToHome plugin remains required on this travel router on every supported firmware. Wait for the Tailscale status to return to green before testing.
5. Approve travel-router subnets and avoid route conflicts
Open the Tailscale Machines page, locate the travel router, choose Edit route settings and approve its advertised LAN route. Approve the guest route too if you enabled guest-network access through the plugin. Current GL.iNet firmware advertises these routes from the admin panel, so the old manual tailscale up --advertise-routes=... command is no longer the default procedure.
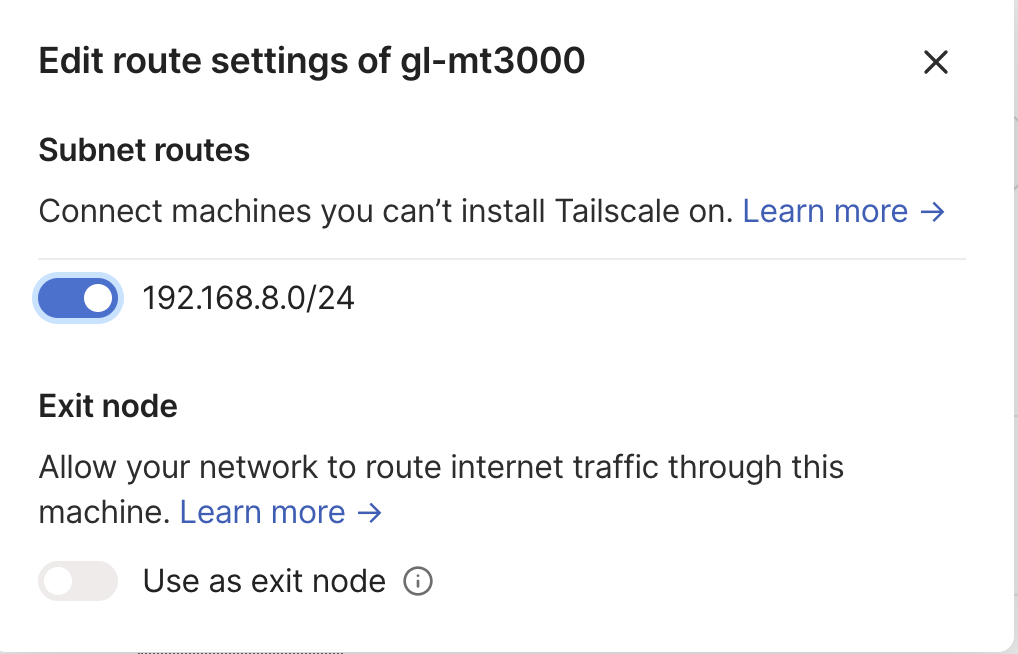
Use a unique LAN and guest subnet on every router. If the home and travel routers both use GL.iNet's default 192.168.8.0/24, Tailscale cannot reliably determine which router owns that route. For example, keep the home router on 192.168.8.0/24 and change the travel router to 192.168.10.0/24 under Network > LAN.
Once you’ve enabled subnets, verify that the “Edit route settings” page for your GL.iNet router shows the intended, non-overlapping route:
Conditional LuCI firewall fallback after the required RTH plugin
Normal travel-router path: install and enable RemoteToHome's gl-tailscale-fix plugin on the travel router before remote work, regardless of firmware, including 4.9+. Then use the current GL.iNet Tailscale controls to enable or advertise the LAN subnet; if the travel router is already on 4.9+, use Advertise LAN Subnets, while older supported firmware may show Allow Remote Access LAN; approve the advertised route in Tailscale. The native 4.9+ controls do not replace the plugin, and this manual firewall fallback is not a substitute for either the plugin or route approval.
Open System > Advanced Settings > LuCI, then select Network > Firewall. On older LuCI layouts, the default zones are shown as:
lan > wanwan > REJECTguest > wan
Edit the wan > REJECT entry (on some versions this appears as the wan zone with a REJECT forward policy). Open Advanced Settings and add tailscale0 to Covered devices. Select Save, then Save & Apply. Reboot the travel router if it still does not pass traffic.
Preserve the existing security policy: keep lan > wan forwarding in place, retain the wan > REJECT behavior, and leave the firewall enabled. This fallback only adds tailscale0 to the WAN-zone covered devices; it does not replace the zone policy or loosen other forwarding rules. If your firmware does not show these fields, use the current GL.iNet Tailscale controls and the kill-switch path below; menu names and behavior vary by firmware.
6. Verify the required RemoteToHome kill switch
tailscaled itself crashes, is killed for lack of memory or is absent during a service restart. A brief leak can still be enough for a continuously connected service to record the travel IP.
Install the current gl-tailscale-fix plugin on the travel router if you have not already done so, and enable its Kill Switch after selecting the custom exit node. This requirement applies on 4.9+ as well as older firmware. The plugin keeps independent kernel policy-routing blocks in place when the Tailscale daemon is not running, and its current release covers both IPv4 and IPv6 as well as the optional guest network.
Do not treat GL.iNet's native 4.9+ daemon-independent kill switch as sufficient for travel-router remote work. RemoteToHome's testing describes the native coverage as IPv4 on the primary LAN only. The required plugin coexists with it and adds guest-network, IPv6 and exit-node-change protection. Follow the maintainer's current guide because these details may change with later GL.iNet releases.
Do not substitute GL.iNet's general Block Non-VPN Traffic control for this step; that control is designed around GL.iNet's conventional WireGuard/OpenVPN client framework, not this Tailscale failure mode. After setup, test from a device behind the travel router by confirming the home IP, stopping tailscaled on the travel router and verifying that internet access stops rather than falling back to the local WAN.
7. Confirm your client device (ex. work computer) is showing your home IP
Now that you’ve turned on the Tailscale exit node on your travel router, connect your client laptop to the travel router using the Repeater function (connect to a phone hotspot, not your home network). You don’t want to test if your VPN works by connecting your travel router to the home internet!
Once your travel router is receiving internet, open a new browser tab on your connected device and visit: https://icanhazvpn.com
Check if the IP address matches your home IP address.
Remember that the maximum DOWNLOAD speed you will be able to achieve at your work computer when connected to the Tailscale exit node will be your home internet’s UPLOAD speed. If this doesn’t make sense, try drawing out on a piece of paper the connection including acknowledgements/requests between your client computer and the Internet (via your exit node).
Recommended DNS Settings
On the travel router, go to Network > DNS, enable Override DNS Settings of All Clients, then use Encrypted DNS (recommended) or manually enter public resolvers such as 1.1.1.1 and 8.8.8.8. Automatic DNS can inherit a private resolver from a hotel or local ISP that becomes unreachable after traffic moves through the exit node.
GL.iNet's Tailscale integration uses --accept-dns=false, so nameserver and MagicDNS selections in the Tailscale admin console generally do not configure DNS for clients behind the router. Configure DNS on the GL.iNet router itself.
After configuration, verify both the public IP and DNS path from a device connected behind the travel router. The exit-node router at home can normally remain on Automatic DNS because its local WAN resolver is directly reachable.